How to Build a Serverless Web Application with React, API Gateway, Lambda, & DynamoDB

Software engineer based in Pittsburgh, PA with interests in cloud computing, cybersecurity, and professional growth.
Some other things I like: history, exercise, rock climbing, coffee shops, live music, reading, podcasts
In this tutorial, we’ll be walking through the steps to create a basic web application that takes user input and makes a request to a serverless backend consisting of an API Gateway, a Lambda function, and a DynamoDB table. By the end of this tutorial, you will understand the basic components of a serverless web app using AWS and lay the groundwork for building scalable, flexible, and easily deployable apps.
Intro to Serverless
In recent years, increasingly more infrastructure has been migrating to the cloud, freeing companies from purchasing and managing physical servers. Cloud providers have made it cheap and easy for customers to run their code on rented server space while still provisioning and managing the servers themselves. This is known as Infrastructure as a Service (IaaS), and it allows customers to rent virtual machines, storage capacity, and other resources easily, but they still have to provision resources and manage the virtual machines themselves. An example of IaaS is Amazon’s Elastic Cloud Computing (EC2).
But, what if a developer wants to just run code without thinking about provisioning, managing, and maintaining servers at all? This is what serverless architecture allows – the developer can focus on the code while the cloud provider handles the rest. This is why serverless is also sometimes called “fully managed”. Along with handing off management, serverless is flexible and scalable; If a serverless app receives a surge in traffic, the app can scale up. The necessary resources will be created by the cloud provider to handle the surge, and then scale down when the resources are no longer needed.
What if the application doesn’t need to run 24/7? This is where FaaS (Function as a Service) comes in. AWS Lambda is an example of this – the developer just writes the code, and the function is invoked on-demand. AWS will start the necessary resources, run the code, and shut down when finished. No application is constantly running on a server, and no server is constantly running.
Multiple AWS services support serverless architecture with autoscaling, pay-for-what-you-use pricing, and minimal setup and maintenance. We will be using some of them in our application.

Many companies, such as Netflix, T-Mobile, and Square Enix are now using serverless in some capacity. Developers and companies have offloaded managing infrastructure to cloud providers and are focusing on development. If you are looking to build scalable, flexible, resilient applications, serverless may be a great choice.
Our Serverless Application
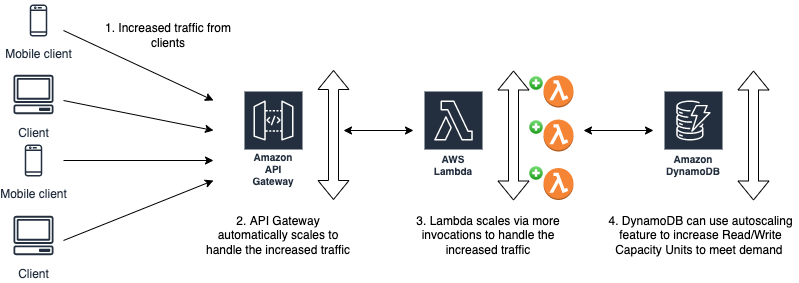
We will be building a web app that accepts user input, sends a request to the backend, stores the input as a DynamoDB item, and returns the result to the user. Here is a diagram of what this will look like:

Components:
- React Web Page: User-facing front end
- API Gateway: Fully managed tool for creating scalable APIs
- Lambda function: Function as a Service, run code on demand
- DynamoDB: Fully managed, serverless, key-value NoSQL database
Prerequisites:
- AWS account and AWS Management Console access
- npm or yarn installed
- Code editor (VS Code, Sublime, Atom, etc...)
React Web Page
The first step in creating our web app is a simple webpage that takes user input and sends a POST request to our backend. We’ll be using the popular Javascript framework React.js to accomplish this. React is a great choice for web applications due to its flexibility, great developer experience, and robust community for resources and support. This tutorial won’t dive into React too much, but I encourage you to check out their tutorial if you want to learn more.
An easy way to get started is using create-react-app, which will make a starter React app with one command. It also gives us a development server, which will hot reload when you save changes to your code. You won’t have to stop, recompile, and run your code every time you make changes.
After setting up create-react-app, navigate to where you want your application and run the following:
npx create-react-app your-app-name
cd your-app-name
Then, to install dependencies, including an HTTP client called Axios we’ll use to make a request to the backend when we click the submit button, and start your development server:
npm install
npm install axios
npm start
Note: if you use yarn, you can replace any
npmcommands with the correspondingyarnvariant
Open your browser and go to localhost:3000, and you’ll see your application!
Now that we have our boilerplate ready, we can start coding. In your created application, open src/App.js, and replace everything in the file with the following code:
import React, { useState } from "react";
import axios from "axios";

const initialValues = {
 name: "",
 year: "",
 rating: ""
};

const App = (props) => {
 const [values, setValues] = useState(initialValues);
 const [result, setResult] = useState("");

 function handleInputChange(event) {
   const { name, value } = event.target;

   setValues({
     ...values,
     [name]: value,
   });
 }

 function handleSubmit(event) {
   event.preventDefault();

   axios
     .post(
       "https://example.execute-api.us-east-2.amazonaws.com/create-movie-rating",
       {
         name: values.name,
         year: values.year,
         rating: values.rating,
       }
     )
     .then((response) => {
       console.log(response);
       setResult("Successfully rated movie!")

     })
     .catch((error) => {
       console.log(error);
       setResult("Something went wrong!")
     });
 }

 return (
   <div className="App">
     <form onSubmit={e => handleSubmit(e)}>
       <label>Name:</label><br />

       <input type="text" name="name" value={values.name} onChange={e => handleInputChange(e)} id="name"></input><br />
       <br />

       <label>Year:</label><br />
       <input type="text" name="year" value={values.year} onChange={e => handleInputChange(e)} id="year"></input><br />
       <br />

       <label>Rating:</label><br />
       <input type="text" name="rating" value={values.rating} onChange={e => handleInputChange(e)} id="rating"></input><br />
       <br />

       <input type="submit" id="submit-button"></input>
     </form>

     <p>{result}</p>
   </div>
 );
}

export default App;
Note: We aren’t going to be focusing on CSS, styles, and making the user interface look pretty. If you’re interested in simple but attractive UIs with React, I recommend checking out MaterialUI (https://mui.com/).
Let’s walk through what we just added. When our app loads, the useState hook sets an initial state, and the component is rendered with the return function. With every state change, React will re-render the component. This is the magic of the React framework:
const initialValues = {
 name: "",
 year: "",
 rating: ""
};

 const [values, setValues] = useState(initialValues);
 const [result, setResult] = useState("");
As we make changes in our form, our handleInputChange function will update our app’s state to hold our user input:
<input type="text" name="name" value={values.name} onChange={e => handleInputChange(e)} id="name"></input><br />
function handleInputChange(event) {
   const { name, value } = event.target;

   setValues({
     ...values,
     [name]: value,
   });
 }
When we click the submit button, handleSubmit makes a POST request with values from our state in the body. The URL we post to will be our endpoint in API Gateway, which we’ll add later. We then log the response or error and display a message to the user using another variable in our state, result.
<form onSubmit={e => handleSubmit(e)}>
function handleSubmit(event) {
   event.preventDefault();

   axios
     .post(
       "https://example.execute-api.us-east-2.amazonaws.com/create-movie-rating",
       {
         name: values.name,
         year: values.year,
         rating: values.rating,
       }
     )
     .then((response) => {
       console.log(response);
       setResult("Successfully rated movie!")

     })
     .catch((error) => {
       console.log(error);
       setResult("Something went wrong!")
     });
 }
Save your app, and if you have your development server running, the site in your browser should live update to look like this:

Setting up the DynamoDB Table
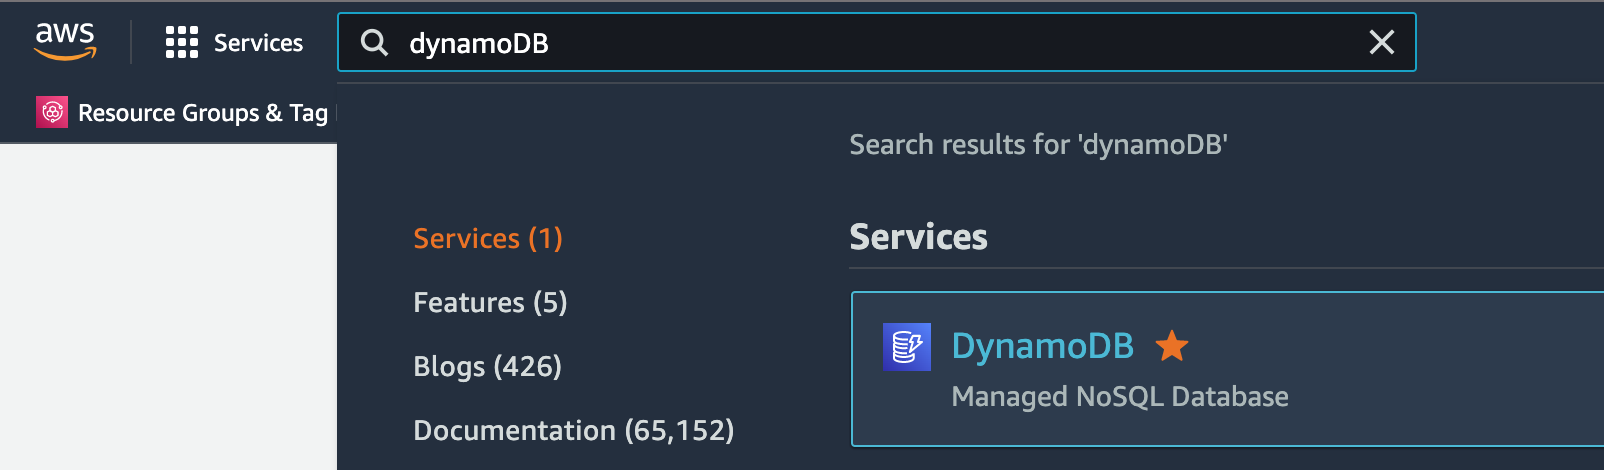
Log in to your account and navigate to the DynamoDB console using the search bar at the top of the page:
Click “Create Table”. Note your region in the top right corner of the AWS Management console. The table will only be available within this region.

Add a table name of “movies” in the Table name input Add a partition key of “name” in the Partition key input, with a String type Add a sort key of “year” in the Sort key input, with a String type
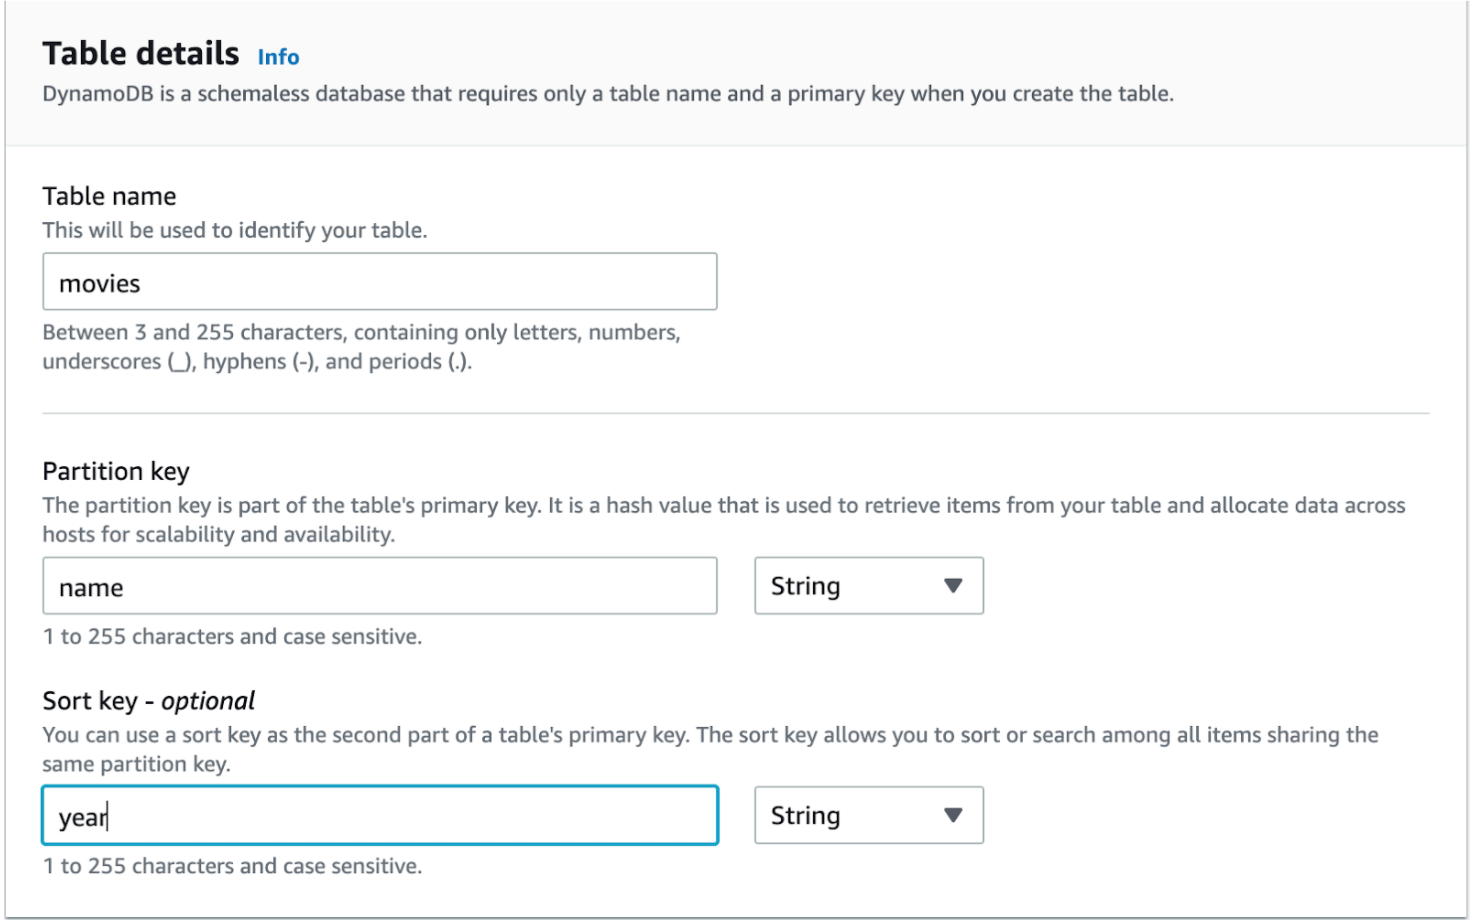
Note: We will be using user input values as our partition and sort keys. Partition keys should be highly distributed (as unique as possible) but Sort keys can be added to create a unique Composite key. To learn more about keys, see this guide by AWS
Leave Default settings selected, and do not add any tags. Click “Create Table”. While table setup is finishing, we can begin writing a Lambda function that will write items to it.
Lambda Function for Creating a New Item
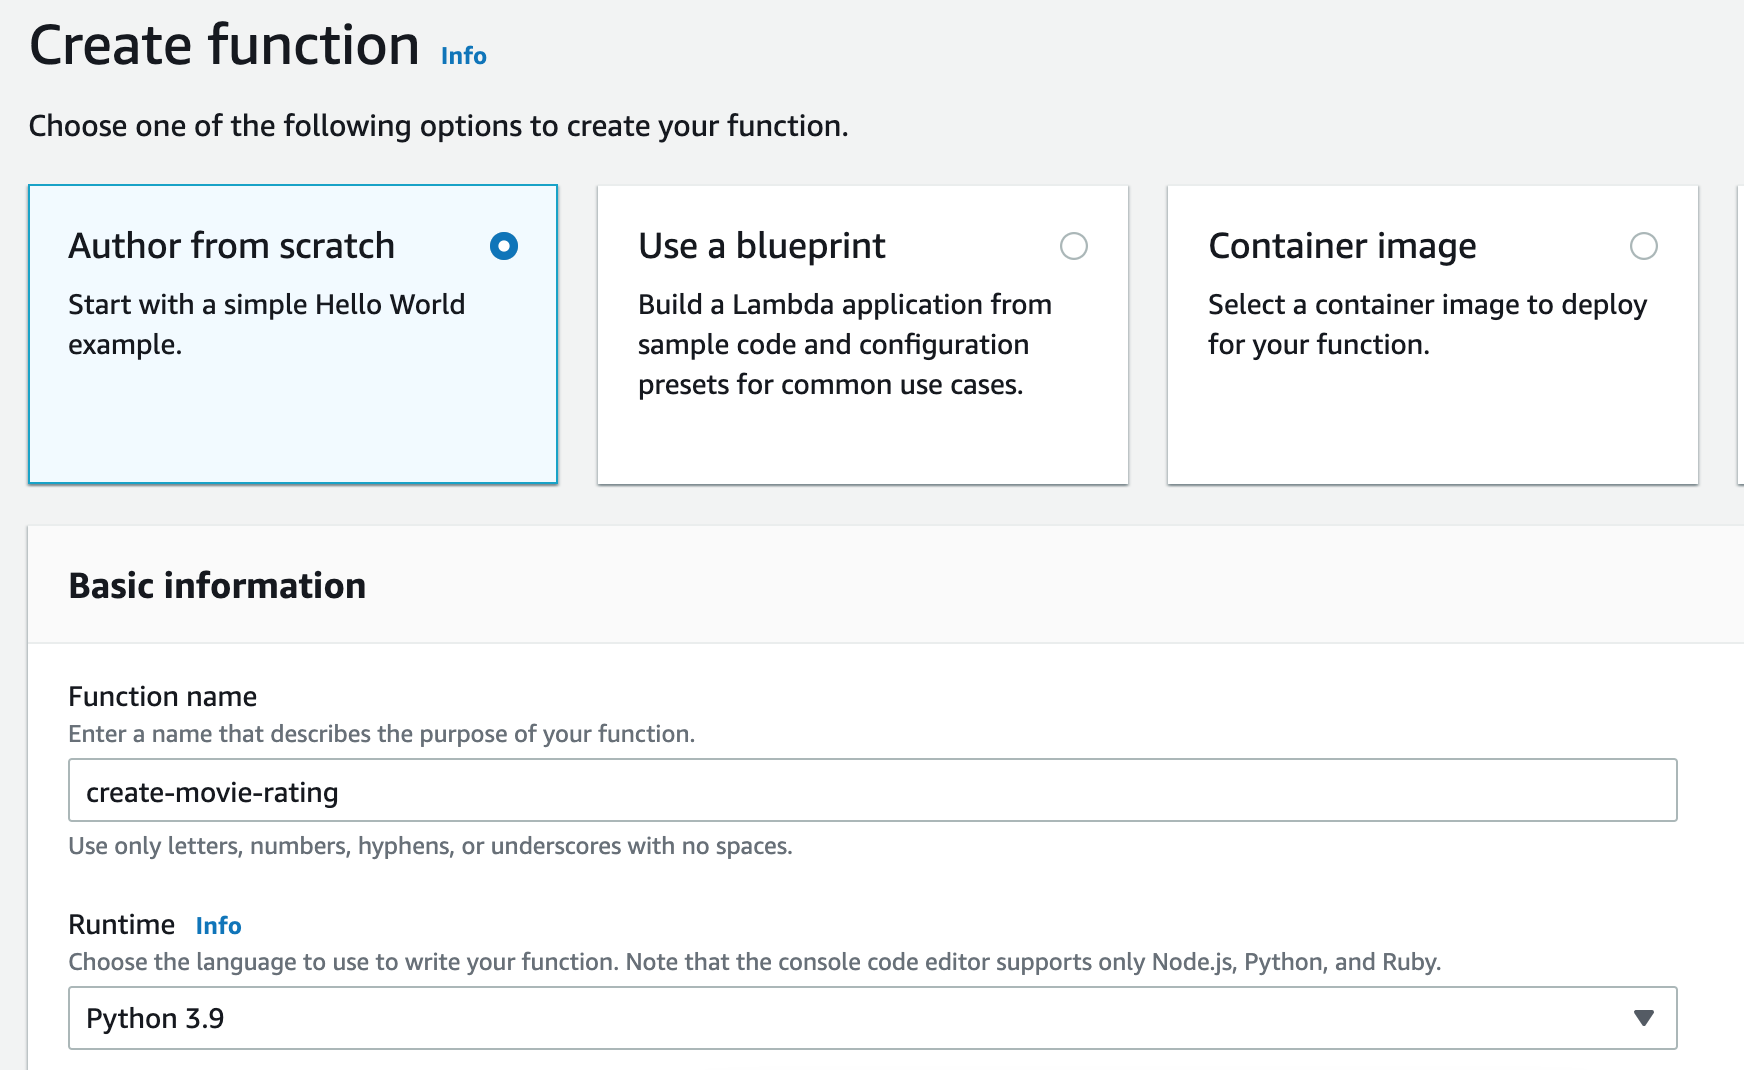
Navigate to the Lambda service within the AWS Console. Click “Create Function”. On the Create Function page, keep “Author from scratch” selected, and name your function “create-movie-rating”.
Choose the Python 3.9 runtime (latest at time of writing), and leave the rest of the options as their defaults. We’ll deal with permissions later.
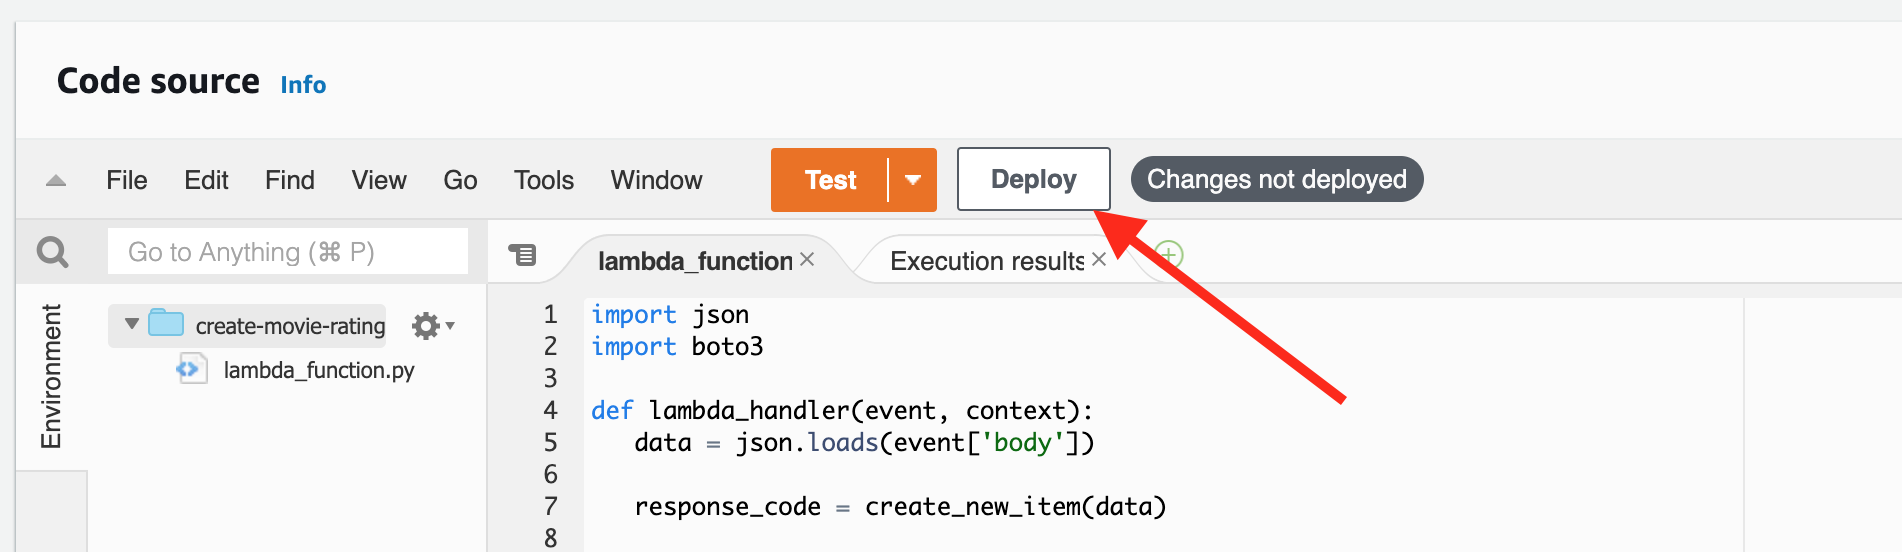
Click “Create Function” and you’ll be redirected to the function’s page. Add the following code in the built-in editor, and we’ll walk through each part:
import json
import boto3

def lambda_handler(event, context):
   data = json.loads(event['body'])

   response_code = create_new_item(data)

   # Only return the sent data in the body if creation was successful
   if (response_code == 201):
       body = json.dumps(data)
   else:
       body = None

   response = {
     "statusCode": response_code,
     "headers": {
       "Access-Control-Allow-Origin" : "*",
       "Access-Control-Allow-Credentials" : "true",
       "Content-Type": "application/json"
     },
     "body": body
   }

   return response


def create_new_item(item):
   # Table specific info. Be sure to update region and table name if necessary
   dynamodb = boto3.resource('dynamodb', region_name = 'us-east-2')
   table = dynamodb.Table('movies')

   try:
       res = table.put_item(
           Item={
               'name': item['name'],
               'year': item['year'],
               'rating': item['rating']
           }
       )

       code = res['ResponseMetadata']['HTTPStatusCode']
   except KeyError as e:
       print("Invalid parameters")
       print(e)
       return 400
   except Exception as e:
       print(e)
       return 500

   # Return codes for the front end
   if (code == 200):
       print("Product successfully created")
       return 201
   else:
       print("Error creating product")
       return 500
Note: Be sure to enter the correct
region_name. Some AWS resources are region-scoped, and may not be available to other regions. Usually, the region you should use will be auto selected and appear in the top-right corner of your AWS console.
Each time our Lambda is invoked, it calls the lambda_handler function. Event is the payload sent by the user via SDK, integration, or test event. Context is an object containing metadata about the invocation itself.
Since we’ll be integrating this Lambda with a REST API Gateway using Lambda proxy integration, the event object will be the full HTTP request. You can do all sorts of magic here working with the request, but we just need to extract the body from our POST request to work with the user’s input. We then pass our parsed user input to our function create_new_item, which creates a resource for interacting with DynamoDB:
data = json.loads(event['body'])

response_code = create_new_item(data)
We now have to extract each parameter from our sent data, and using DynamoDB’s put_item operation, we attempt to create an item:
dynamodb = boto3.resource('dynamodb', region_name = 'us-east-2')
   table = dynamodb.Table('movies')

   try:
       res = table.put_item(
           Item={
               'name': item['name'],
               'year': item['year'],
               'rating': item['rating']
           }
       )

       code = res['ResponseMetadata']['HTTPStatusCode']
   except KeyError as e:
       print("Invalid parameters")
       print(e)
       return 400
   except Exception as e:
       print(e)
       return 500
We’ve added some error handling in case we can’t connect to DynamoDB, are missing a key, or have an invalid parameter.
Then, we check our response code from the put_item operation to see if the item creation was successful, and return a custom response code. Our custom response code is added to our response, which includes the original user input if the DynamoDB item creation was successful. This response will be passed back to the API Gateway and then to the client:
   if (code == 200):
       print("Product successfully created")
       return 201
   else:
       print("Error creating product")
       return 500
# Only return the sent data in the body if creation was successful
   if (response_code == 201):
       body = json.dumps(data)
   else:
       body = None

   response = {
     "statusCode": response_code,
     "headers": {
       "Access-Control-Allow-Origin" : "*",
       "Access-Control-Allow-Credentials" : "true",
       "Content-Type": "application/json"
     },
     "body": body
   }

   return response
Click “Deploy” to deploy our function. Without this step, an old version of our function will run. Don’t forget!
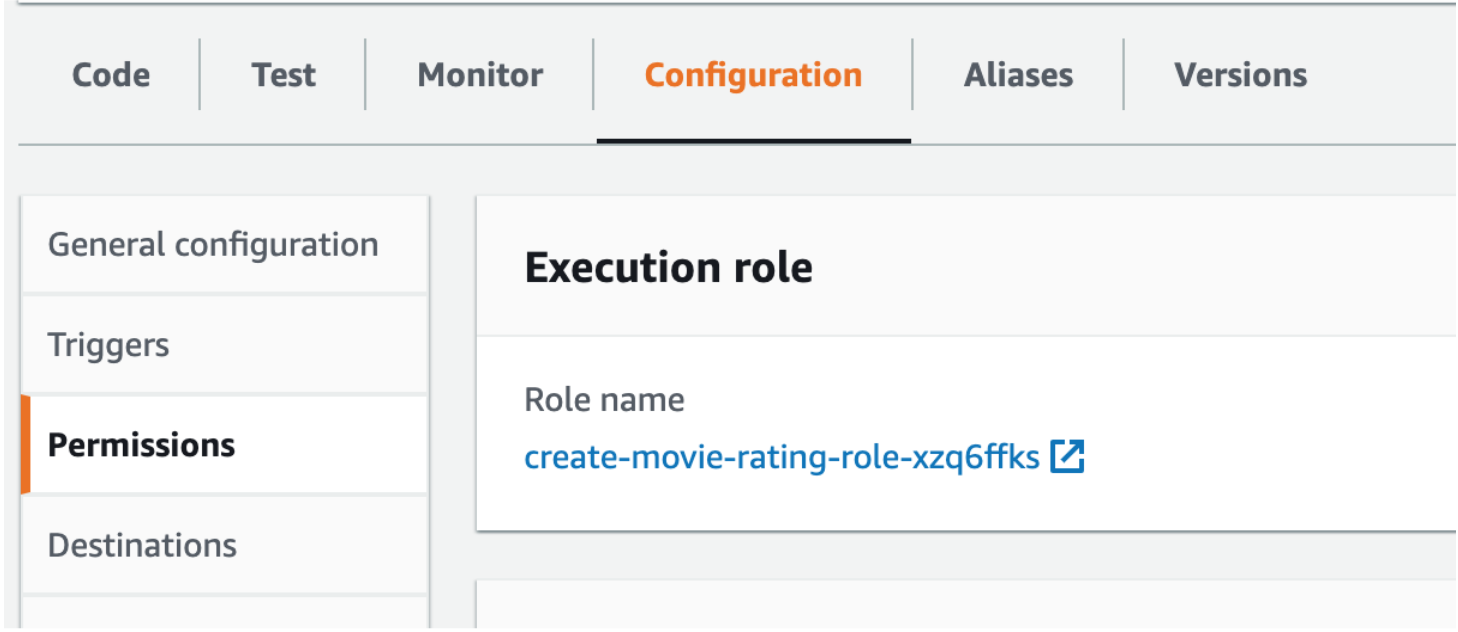
Finally, we need to give our Lambda function permission to access DynamoDB. In the AWS Console, navigate to the “Configuration” tab, and click the link to your function’s execution role. This will bring you to the IAM console where you can add permissions to your function.
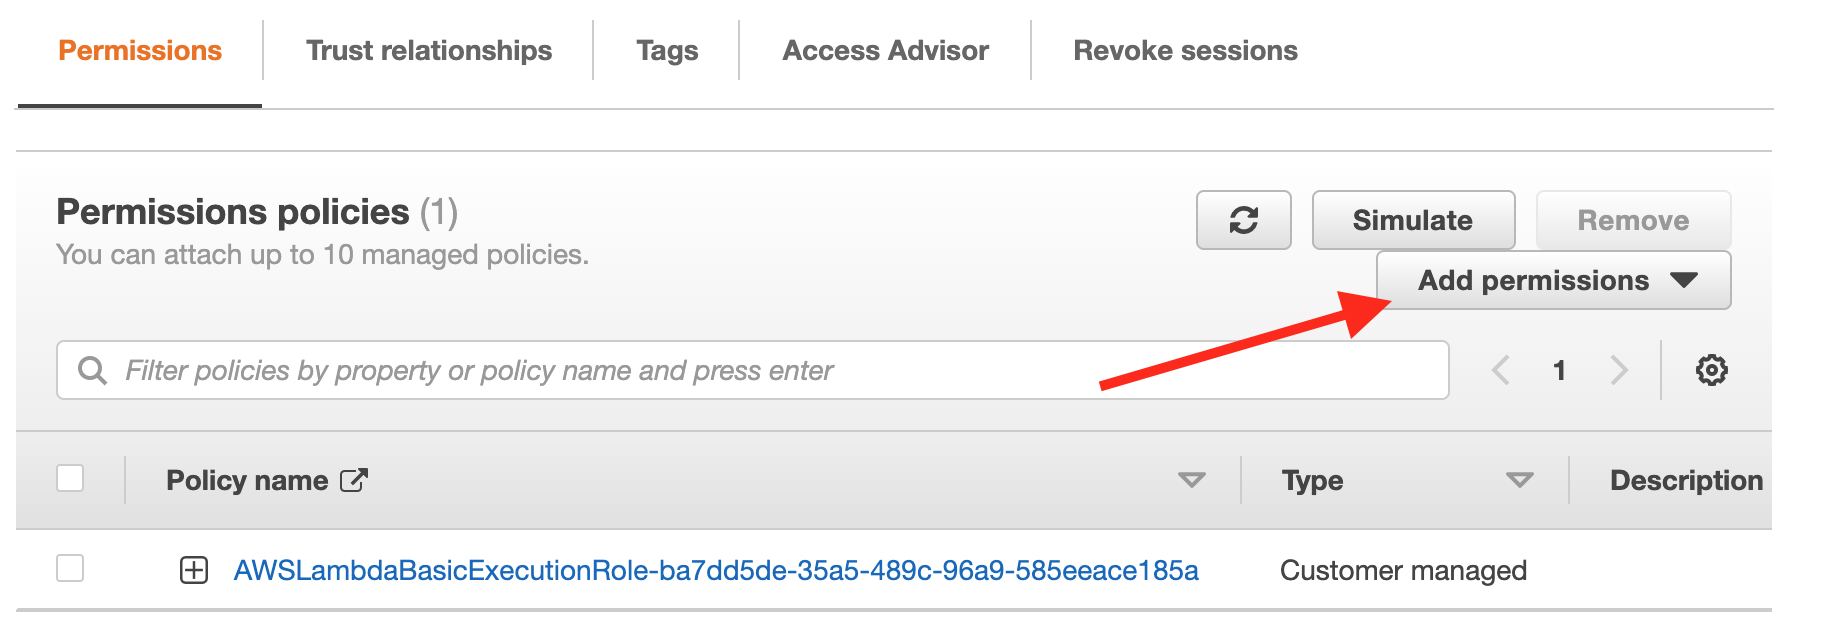
Click “Add permissions” > “Create inline policy”, and use the JSON tab.
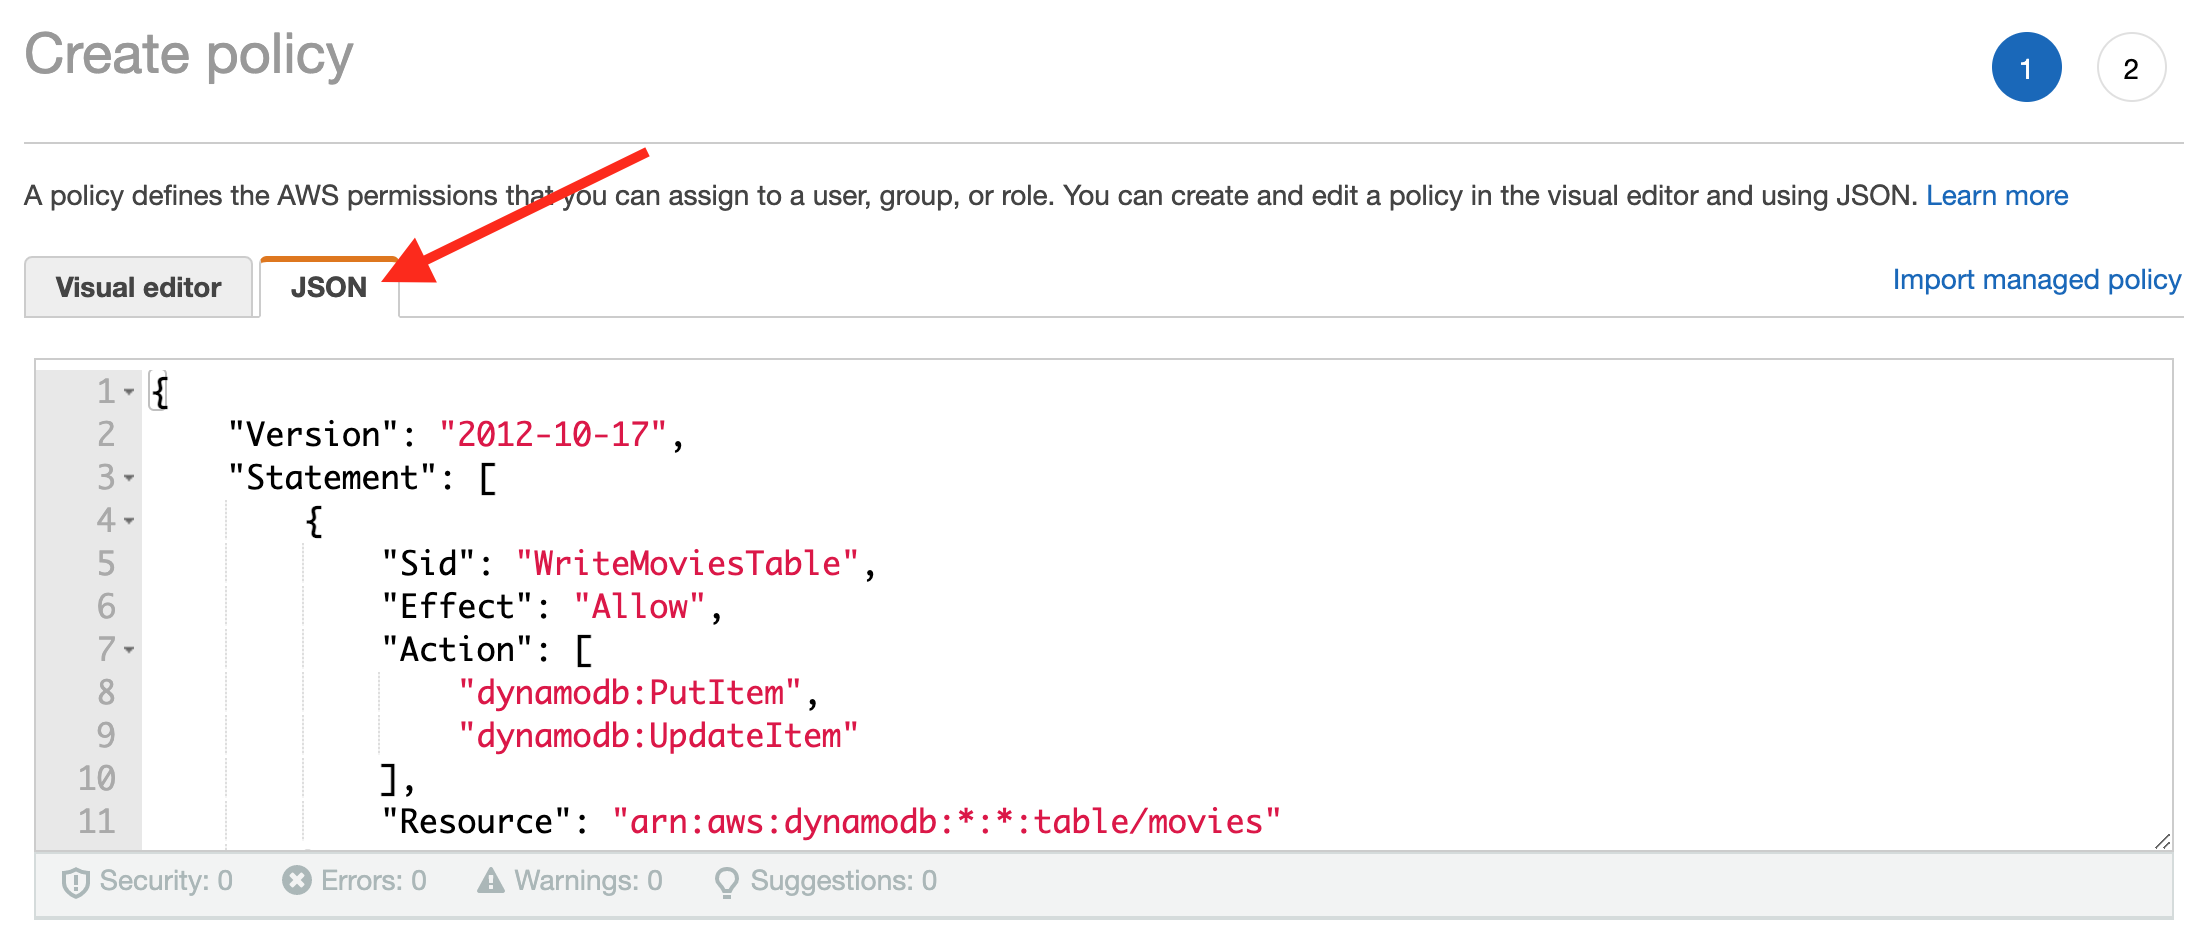
Replace the boilerplate with the following JSON policy:
{
   "Version": "2012-10-17",
   "Statement": [
       {
           "Sid": "WriteMoviesTable",
           "Effect": "Allow",
           "Action": [
               "dynamodb:PutItem",
               "dynamodb:UpdateItem"
           ],
           "Resource": "arn:aws:dynamodb:*:*:table/movies"
       }
   ]
}
This policy allows the function to write to the table we created earlier. Finish creating the policy by clicking “Review policy”, give your policy a descriptive name like “read-write-movies-table”, and click “Create Policy”.
Integrating API Gateway with Lambda
Now that our Lambda function is set up, we can integrate it with API Gateway. Navigate to the API Gateway service in the AWS Console.
Click “Create API”. AWS offers a few options for API Gateway – HTTP, WebSocket, and public or private REST APIs. We will be using an HTTP API in our serverless app; more lightweight than the REST API, but allows for easy integration with Lambda functions.
Note: You can read more about API Gateway options here (https://docs.aws.amazon.com/apigateway/latest/developerguide/http-api-vs-rest.html ).
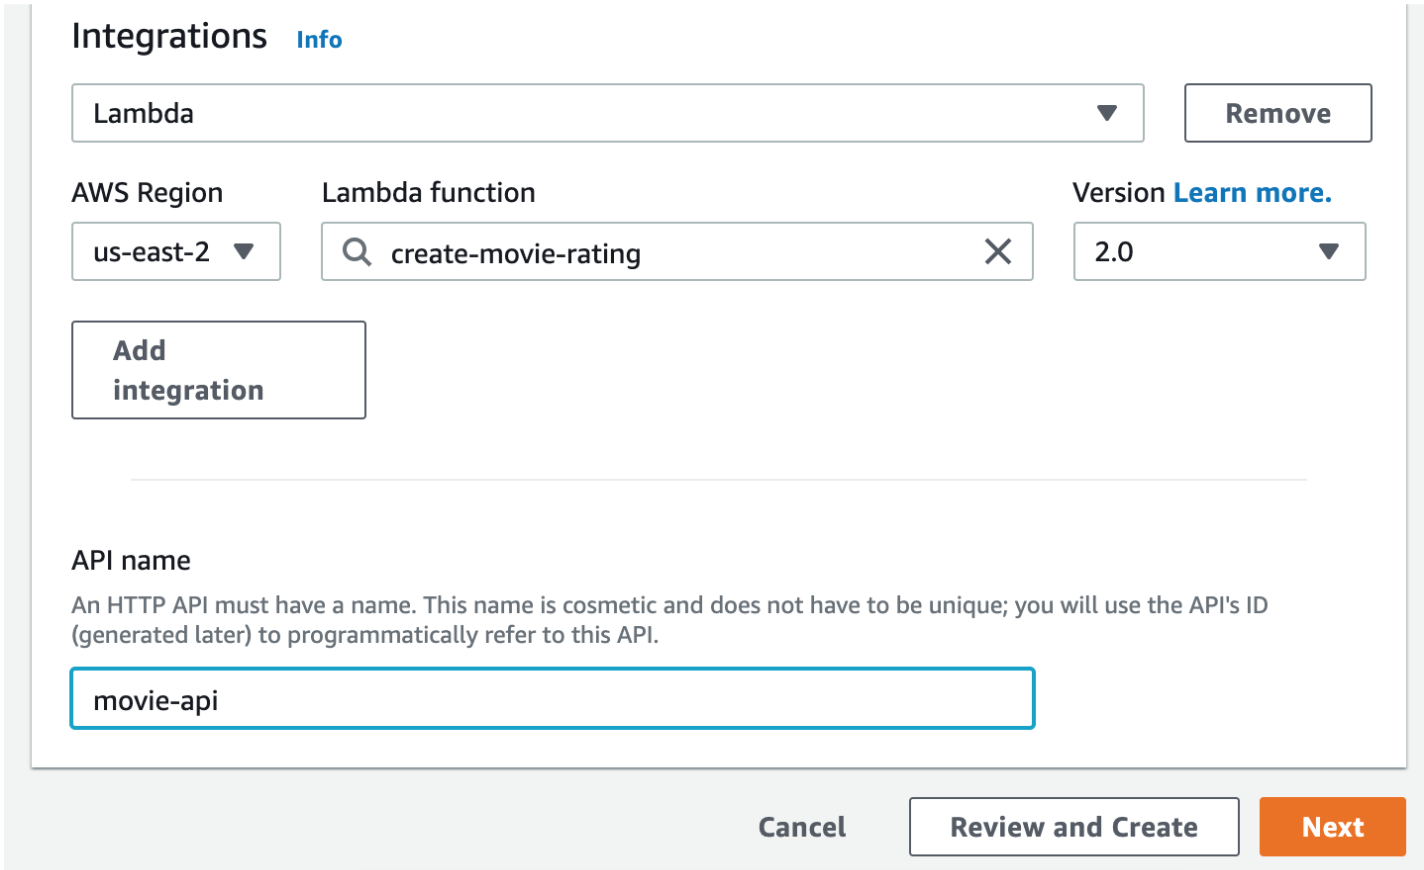
Click “Build” in the HTTP API card. Click “Add integration”, and add an integration of type “Lambda”, and add your function that you created earlier (be sure you are in the correct region. Leave the version at 2.0. Add a name for your API, like “movie-api”.
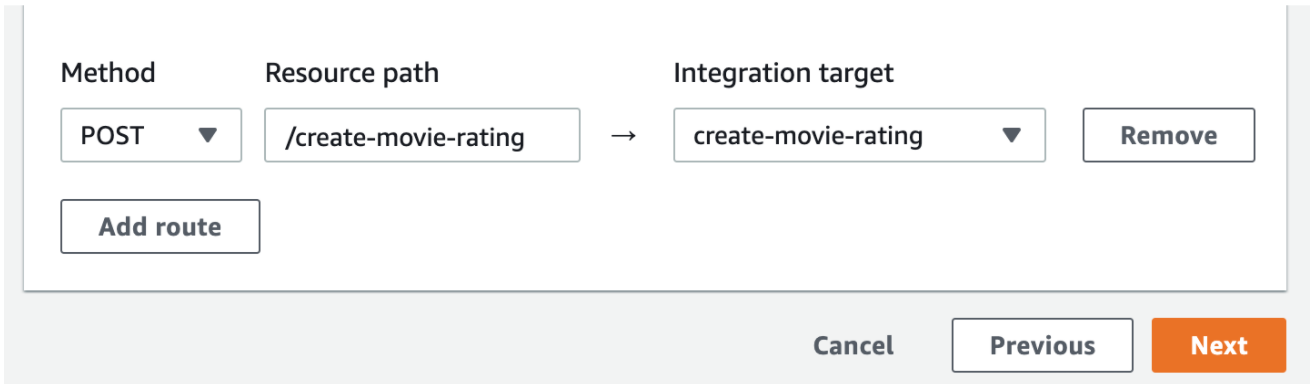
Click “Next”. Here, we will configure our routes for our API. You can see that the default route for your integration is named the same as your Lambda function. All we have to do here is change the HTTP method from ANY to POST. When you add a Lambda integration, it automatically gives permissions to API Gateway to access the Lambda function
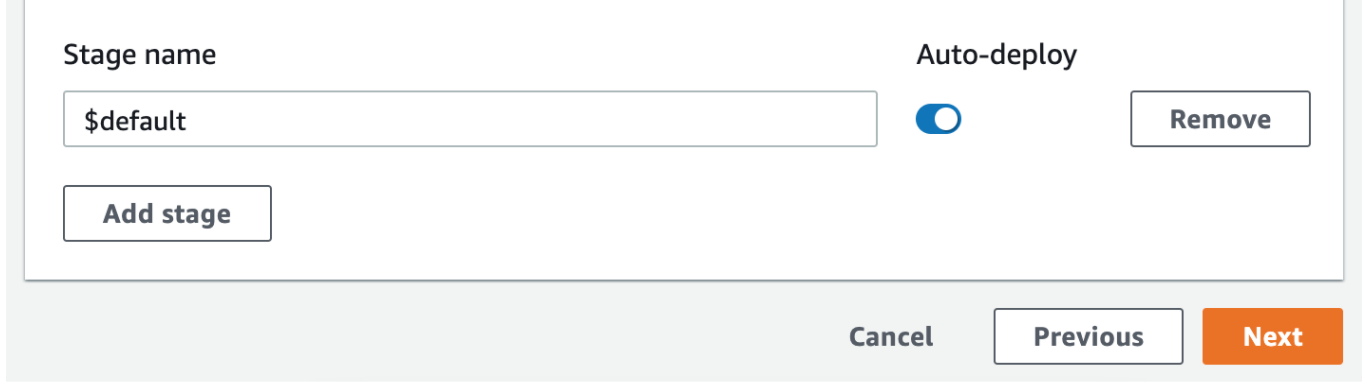
Click “Next”. In API Gateway, you can set up multiple versions of your API (test, production, etc.), called Stages. We’re keeping it simple here, so leave these settings as their defaults:
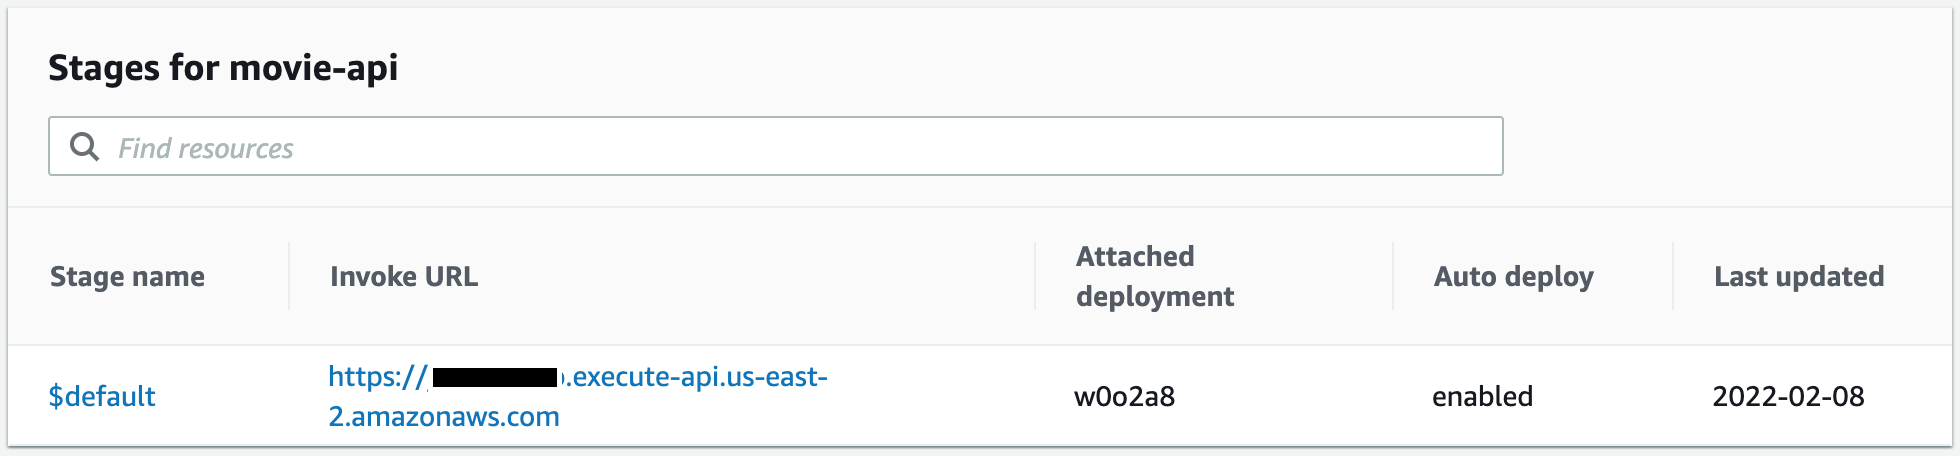
Click “Next”. Review your settings, and click “Create”. In the next page, you can view all of your details about your API. In the Stages section, you’ll see an Invoke URL. Copy this URL, as we need to add it to our client application so it can make requests to the backend. In App.js, add the invoke URL to the axios request, along with the route for our Lambda integration:
 axios
    .post(
       "https://example.execute-api.us-east-2.amazonaws.com/create-movie-rating",
       {
         name: values.name,
         year: values.year,
         rating: values.rating,

       }
     )
One final step we need to do is enable Cross Origin Resource Sharing (CORS) between our front end and the API. Navigate to the CORS section in the API’s page. Click “Configure” and in the sections for Access-Control-Allow-Origin, Access-Control-Allow-Headers, and Access-Control-Allow-Methods, add “*” to allow all. Be sure to save your CORS settings:
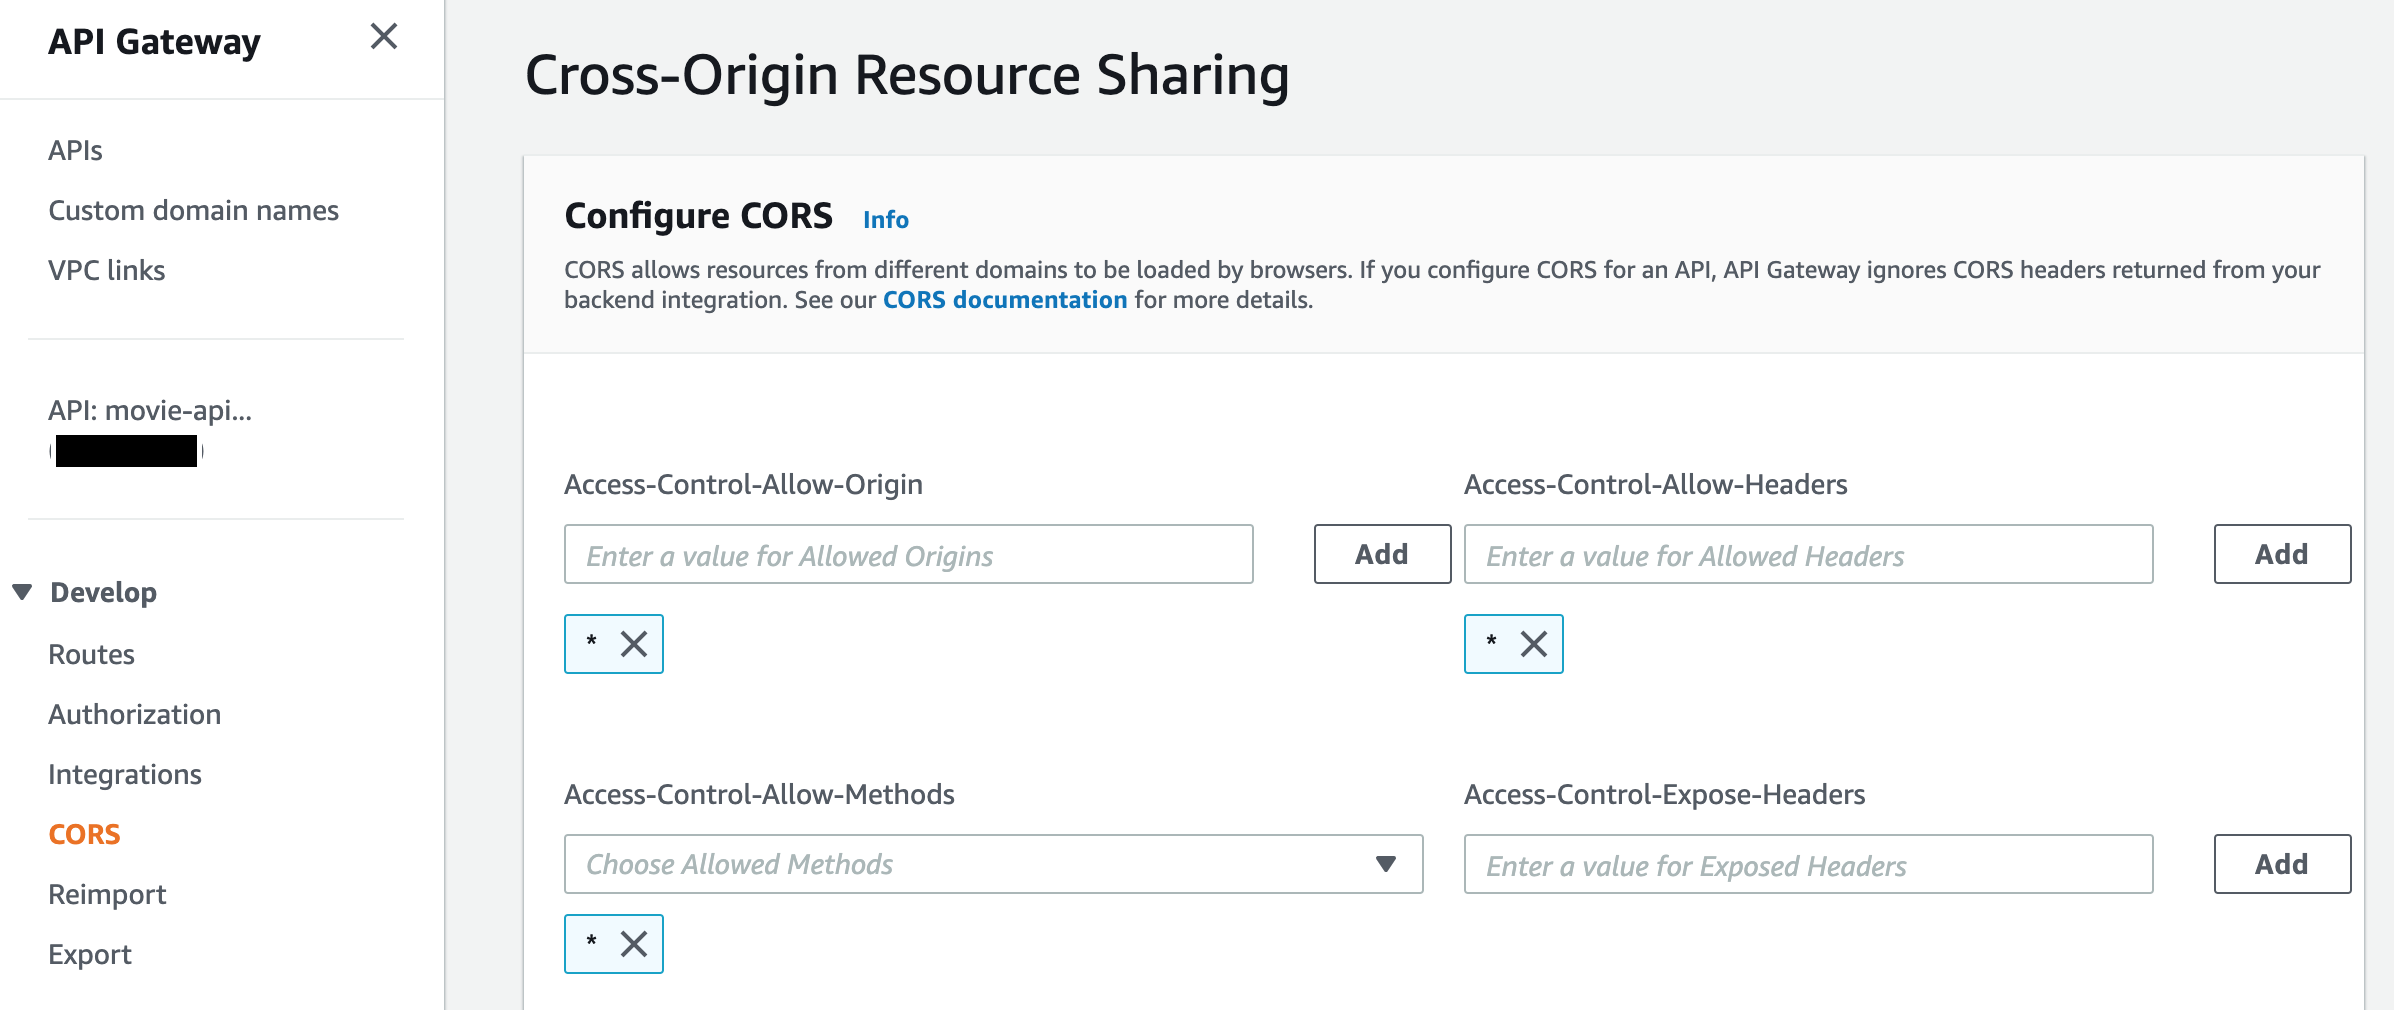
Note: It is not a best practice to allow all, or to grant more permissions than are needed. This is called the Principle of Least Privilege; Only grant the privileges to users/components which are necessary to complete their tasks. For our learning purposes, we will move forward with these broad permissions.
Testing the Application
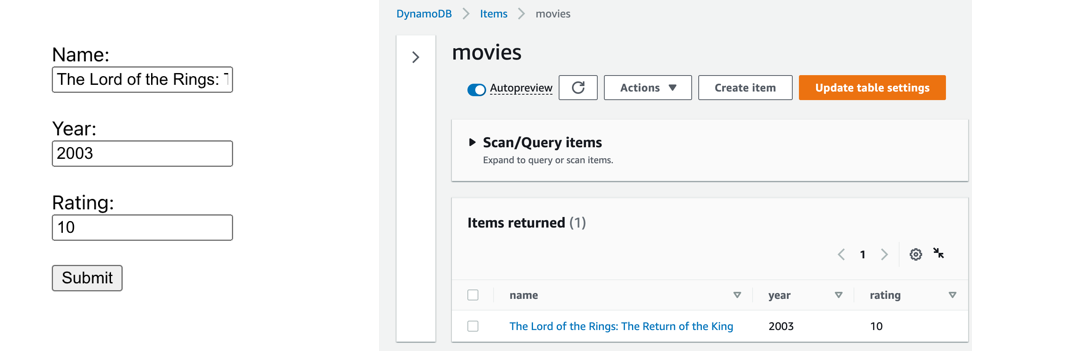
Be sure that your development server is still running on localhost:3000. You can now fill out your form with your favorite movie, and add a rating for it. Click “Submit”, and a success message should appear! Head over to the AWS console and go to the DynamoDB service. View the items for your movies table, and you should see your data saved in the backend!
Conclusion
In this tutorial, we’ve created a simple web application consisting of a front end that makes an HTTP request that is handled by API Gateway. API Gateway forwards this request to a Lambda function using a Lambda proxy integration. The function uses the AWS SDK for Python (Boto3) to create a new item in a DynamoDB table, and returns the result to the user. With this simple foundation, you can build robust applications with powerful serverless backends.
Resources
- Link to the full code on GitHub
- AWS Serverless
- Why Serverless Architecture? - New Relic
- IaaS, PaaS, FaaS, CaaS
- Create-react-app
- React Functional vs. Class components


